One of the best things about fiberglass pools is how quickly they go in compared to concrete. A concrete pool takes 3 to 6 months. A fiberglass pool takes a few weeks. But "a few weeks" is still vague, and most homeowners want to know exactly what happens, when, and what their yard will look like along the way.
This article breaks the process into a week-by-week timeline based on how we typically install pools in London and Southwestern Ontario. Every project is a little different, but this gives you a realistic picture of the process from start to finish.
What happens before the dig starts?
Before any equipment shows up at your property, several things need to happen. This pre-construction phase usually takes 2 to 6 weeks, sometimes longer depending on permit timing.
Site visit and yard measurement
Your pool company will visit your property to measure the yard, check access for equipment, identify utility locations, assess soil conditions, and confirm the pool placement. This is where the plan starts to get real. The pool position, patio layout, and equipment pad location are all mapped out during this visit.
Permits
In the City of London, you need a swimming pool fence permit before any pool work can begin. Other municipalities in the area have their own permit requirements. Your pool company should handle the permit application, but the approval process takes time. In London, expect 2 to 4 weeks for permit approval.
Utility locates
Before digging, Ontario One Call marks the location of all underground utilities (gas, water, electrical, cable, phone) on your property. This is a legal requirement. The locate request needs to be submitted at least 5 business days before digging.
Pool shell order
Once the model, colour, and features are confirmed, the pool shell is ordered from the manufacturer. Delivery timelines vary. During peak season (spring), wait times can be 4 to 8 weeks. During the off-season, shells may be available sooner. Your pool company usually coordinates this so the shell arrives just before or just after excavation.
What are the 8 steps of a fiberglass pool installation?
The physical installation follows 8 main steps. Here is a quick overview before we break each one down week by week:
- Measuring the yard and marking the dig area
- Digging the hole to the exact pool dimensions
- Preparing the base with crushed stone for proper support and drainage
- Lowering the shell into the hole and levelling it precisely
- Connecting the plumbing from the pool to the equipment pad
- Backfilling around the pool with crushed stone while simultaneously filling with water
- Pouring the patio and completing the concrete or paver work
- Filling with water and starting up the equipment
Some of these steps happen on the same day. Others take several days. The following week-by-week breakdown shows the typical timing.
Week 1: Excavation, base prep, and setting the pool
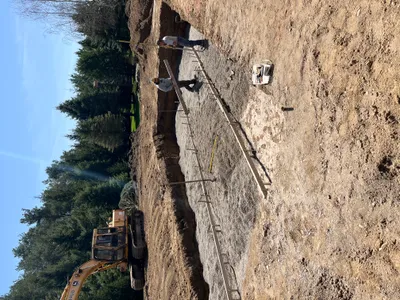
Day 1: Layout and excavation
The crew marks the exact pool outline on the ground using spray paint or stakes. Then the excavator arrives. Depending on the pool size and soil conditions, excavation takes half a day to a full day. The hole is dug to the exact width, length, and depth specified by the pool manufacturer, plus extra room for backfill material around the sides.
The excavated soil is either hauled off-site by dump truck or spread in another area of your yard for grading. Most homeowners choose to have it hauled away because it is a lot of material. A typical pool excavation removes 30 to 50 cubic yards of soil.
This is the loudest and most disruptive day. There will be a large excavator, dump trucks, and a lot of activity. Neighbours will notice. If you have close neighbours, letting them know ahead of time is a good idea.
Day 2: Base preparation
Once the hole is dug, the bottom needs to be perfectly flat and compacted. The crew levels the base, then lays a bed of crushed stone (usually 3/4-inch clear stone) to create a stable, well-draining foundation for the pool shell.
The base needs to be level to within a very tight tolerance. The pool shell sits directly on this stone bed, so any unevenness here means the pool will not be level. This step is done carefully, often with laser levels, and takes most of a day.
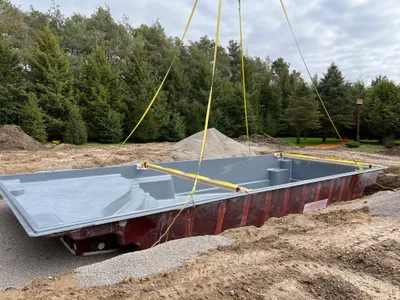
Day 3: Setting the pool shell
This is the most exciting day of the project. The pool shell arrives on a flatbed truck and is lifted by crane over your house and into the excavation. The entire lift usually takes 30 to 60 minutes, but the preparation around it takes longer.
Once the shell is in the hole, the crew adjusts its position and checks the level in all directions. Small adjustments are made by adding or removing stone underneath until the pool is perfectly level and properly positioned. The crew will check and recheck the level multiple times.
By the end of Day 3, you have a pool in the ground. It does not have water in it yet, and there is a gap between the pool and the excavation walls, but the shape of your new pool is visible and real.
Week 2: Plumbing, backfill, and electrical
Days 4-5: Plumbing
The plumber connects the pool's returns, skimmer, and main drain to PVC pipes that run underground from the pool to the equipment pad. The equipment pad is usually located 15 to 30 feet from the pool, near your house or garage.
The plumbing lines are run behind and underneath the pool shell, through the backfill area, and into the equipment pad. All connections are pressure-tested to check for leaks before they are buried.
Days 5-7: Backfill
Backfilling is the process of filling the gap between the pool shell and the excavation walls with crushed stone. This is done simultaneously with filling the pool with water. As the stone goes in around the outside, water goes in on the inside. This keeps the pressure balanced so the pool shell does not shift or flex.
The backfill is added in lifts, usually 12 to 18 inches at a time. Each lift is compacted before the next one goes in. This takes patience. Rushing the backfill can cause problems later, including settling, shifting, or cracking of the patio above.
By the end of the backfill, the pool is surrounded by compacted stone up to ground level, and the pool is partially or fully filled with water.
Days 6-8: Electrical
A licensed electrician runs the wiring from your home's electrical panel to the pool equipment pad. This includes power for the pump, heater (if applicable), pool lights, and any automation system. The electrical work often overlaps with the backfill phase.
The equipment pad area is set up during this time. The pump, filter, heater, and other equipment are mounted, connected to the plumbing, and wired. The electrician also installs a disconnect switch near the equipment pad, which is required by the Ontario Electrical Safety Code.
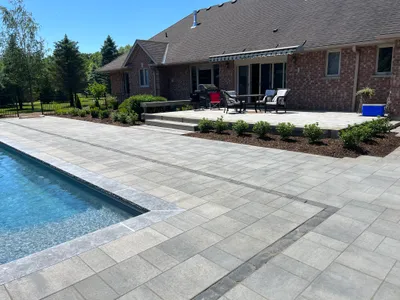
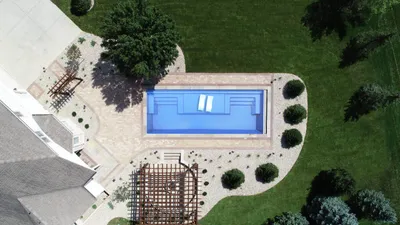
Week 3: Patio, fencing, and grading
Days 9-11: Patio preparation and pour
With the pool backfilled and the equipment connected, the patio work begins. The area around the pool is graded and compacted, forms are set for the concrete, and reinforcing mesh or rebar is placed.
The concrete pour itself usually takes one day. A concrete truck (or multiple trucks for large patios) delivers the concrete, and the crew pours, levels, and finishes the surface. If you chose stamped concrete, the stamping pattern is applied while the concrete is still wet.
After the pour, the concrete needs to cure. You cannot walk on it for at least 24 to 48 hours, and you should not put furniture on it for 5 to 7 days. Full cure takes about 28 days, though the patio is functional well before that.
If you chose pavers instead of concrete, the process is different. The paver base (gravel and sand) is laid and compacted, and the pavers are set by hand. This takes 2 to 4 days depending on the patio size.
Days 10-12: Fencing
Pool fencing is required by the City of London and most Ontario municipalities. The fence must be installed and inspected before the pool can be used. Fence installation typically takes 1 to 2 days.
The fence must meet specific requirements: minimum height (usually 5 feet in London), self-closing and self-latching gates, no climbable features on the outside, and gates that open outward from the pool area. Your pool company or fencing subcontractor should know the local requirements.
Days 11-13: Grading and cleanup
The area around the patio and pool is graded to direct water away from the pool and away from your house. Topsoil is spread, and the disturbed areas are seeded or sodded. Equipment tracks are repaired, and the site is cleaned up.
Week 4: Fill, start-up, and final details
Days 14-16: Final fill and equipment start-up
If the pool was not fully filled during the backfill phase, it is topped off now. A garden hose fills a typical residential pool in 24 to 48 hours. Some homeowners use a water delivery service to fill the pool faster, which costs $300 to $600 depending on pool size.
Once the pool is full, the equipment is started up and tested. The pump runs, the filter circulates water, and the plumbing is checked one final time for leaks. If a heater or salt system was installed, those are tested as well.
Days 16-18: Water chemistry and final walkthrough
Fresh water needs to be balanced before swimming. The pool company tests the water and adds the initial chemicals: chlorine, pH adjuster, alkalinity increaser, and calcium hardness. Getting the chemistry right takes a couple of days of testing and adjusting.
The final walkthrough is where the pool company walks you through everything: how to operate the pump and filter, how to test the water, how to use the automation system (if applicable), when to run the pump, and what the warranty covers. This is also when you get the keys to any gate locks.
Complete timeline at a glance
| Week | What Happens | Duration |
|---|---|---|
| Pre-construction | Permits, utility locates, pool shell order, site visit | 2 – 8 weeks |
| Week 1 | Excavation, base prep, pool shell set | 3 days |
| Week 2 | Plumbing, backfill, electrical, equipment | 4 – 5 days |
| Week 3 | Patio pour, fencing, grading | 4 – 5 days |
| Week 4 | Final fill, start-up, chemistry, walkthrough | 3 – 4 days |
| Total (dig to swim) | 2 – 4 weeks |
The timeline above assumes good weather and no significant site complications. In reality, most projects experience at least one or two rain delays, which can add 3 to 7 days to the schedule.
What can delay the installation?
Even with the best planning, some things are outside anyone's control. Here are the most common causes of delays:
- Rain. This is the most common delay in Ontario. Heavy rain makes excavation impossible, delays concrete pours, and can turn a work site into a mud pit. A few rainy days can push the timeline by a week.
- Permit timing. If permits take longer than expected, the dig cannot start until they are approved. This is more of a pre-construction delay, but it affects the overall timeline.
- Soil surprises. Hitting rock, encountering a high water table, or finding unexpected underground obstacles (old septic tanks, buried concrete) can add time and cost to the excavation.
- Subcontractor scheduling. Electricians, concrete crews, and fence installers all have their own schedules. If one of them gets delayed on another job, it can push your project back.
- Pool shell delivery. Manufacturing delays or shipping issues can delay the shell arrival. This is more common during peak season when manufacturers are running at full capacity.
A good pool company builds buffer time into the schedule and communicates proactively if delays occur. You should expect to be updated regularly on progress, especially if anything changes.
What do you need to do as the homeowner?
The pool company handles the heavy lifting, but there are a few things you need to take care of:
- Clear the work area. Remove anything from the backyard that is in the way: sheds, play equipment, gardens, furniture, and dog runs. The crew needs clear access from the street to the pool location.
- Arrange pet and child safety. Your backyard will be an open construction zone with heavy equipment, open excavations, and construction materials. Keep children and pets inside or supervised elsewhere during active work days.
- Provide water access. The crew needs access to a garden hose for filling the pool. Let them know where the closest outdoor tap is.
- Notify your neighbours. Heavy equipment, trucks, and construction noise will affect your neighbours. A heads-up before dig day goes a long way.
- Be available for key decisions. Some things come up during construction that require your input, like exact positioning of the pool on set day, or adjustments to the patio layout based on site conditions.
- Plan for the walkthrough. Make time for the final walkthrough so you learn how to operate and maintain everything properly.
The installation process is exciting, but it is also messy and disruptive. Knowing that in advance helps set the right expectations. Your backyard will look worse before it looks better, but the end result is worth the temporary disruption.
Frequently Asked Questions
How long does it take to install a fiberglass pool?
A fiberglass pool installation typically takes 2 to 4 weeks from the start of excavation to filling the pool with water. The patio and landscaping may add another 1 to 2 weeks. Weather delays, permit timing, and site conditions can extend the timeline.
What is the messiest part of a pool installation?
Excavation day is the messiest part. A large excavator digs a hole in your yard, and the removed soil is either hauled away or spread on your property. There will be heavy equipment tracks, piles of dirt, and disruption to your yard. It gets cleaner from that point forward.
Can I use my yard during a pool installation?
During the first two weeks of installation, your backyard will be an active construction zone. You should keep children and pets away from the work area. After the pool is set and backfilled, the area becomes safer but is still not finished. Once the patio is poured and cured, normal use resumes.
Do I need to be home during the pool installation?
You do not need to be home for every day of the installation, but you should be available for key milestones like the pre-dig layout, pool placement, and final walkthrough. Most pool companies will communicate progress through photos and check-in calls.
What can delay a fiberglass pool installation?
The most common delays are weather (especially heavy rain), permit timing, unexpected soil conditions (rock, high water table), and scheduling of subcontractors like electricians and concrete crews. Rain delays are the most frequent issue in Ontario. A few days of heavy rain can push the timeline by a week.